How to Configure Cheque Formats
Checkout How to Configure Cheque Formats
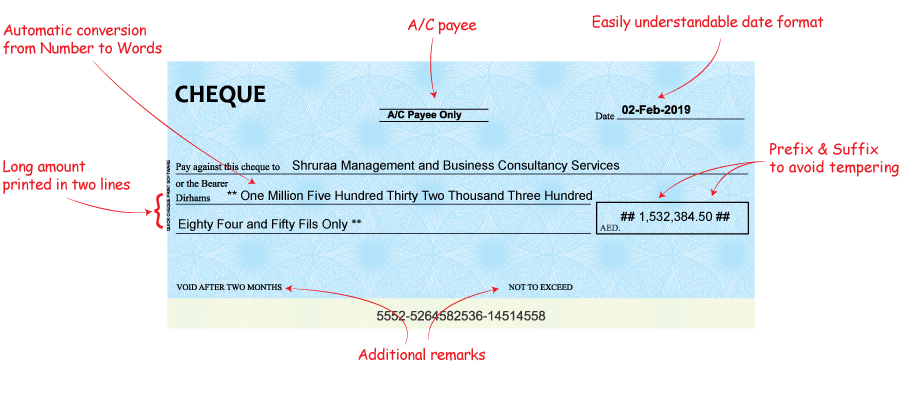
Cheque Formats form the heart of Quick Cheque allowing you to customize how your cheques will be printed. By defining cheque formats, you actually set the printing location of various fields, such as Name, Date, Amount in Words, etc and hence it is a crucial task in configuring Quick Cheque.
4 Steps to Configure your Cheque Formats
- Login to Quick Cheque.
- Navigate to Masters >> Cheque Format.
- Click the button Import Predefined Cheque Formats. This will show you a list of all predefined templates which are configured and ready to use. Select the ones to appropriate and click the Save button to import the formats.
- You can click the Add New button to create a new Cheque format from scratch. Do mail us in case your bank is not listed or you would want a free session to configure your cheque format with your printer.
- Important fields to fill in
- Template Name ► Provide a unique name for each format so as to easily identify and select the cheque format while creating cheques or checkbooks. A good practice is to use the Bank name along with the cheque size as the cheque format name.
- Bank Name ► Select the Bank for which this cheque format is applicable using the Bank drop-down list. The Bank record should be created beforehand. Do mail us in case your bank is not listed so we can add the same for you.
- Amount in Words Prefix and Suffix ► This is a static text which appears at the beginning and end of the Amount in Words field each time a cheque is printed using this cheque template. In case you want the amount in words to be appearing as * Ten Thousand Only ***. then you need to put * in the prefix and Only *** in the suffix fields.
- Amount in Numbers Prefix and Suffix ► Same logic as stated above applies to the Amount in Numbers field.
- Select Font ► Quick Cheque allows you to select various font styles and colors when printing cheques. You can setup the same using the A button at the Cheque format screen and all cheques printed will follow the setting by default. This can however be overridden at the time of printing cheques.
- Cheque Size ► Cheque Size is the total Height & Width of the Cheque measured by a scale and is required to guide the printer for knowing the start and end positions of the cheque. You need to specify the Height (H) and Width (W) for each cheque template in these fields
- Format Settings ► This is where we have to define the exact spot, i.e. the X and the Y axis values for each of the fields to be printed on the cheque. You can either key in these values or drag and drop the fields on the designer to adjust the location. Do not forget to read the “How to measure cheques” link on the screen.
- Word Length ► Enter the character length that can be accommodated on the first line of the amount in the words field. The amount in words will be wrapped up into the second line after this character length is reached on the first line. The default value for this is 60 which can be adjusted based on the space available.
- Once all entries are made, click the Save button to save the Cheque format and proceed to the next step.